Full Node.js Deployment to AWS
FREE SSL, NGINX | Node js HTTPS Server
In this tutorial, we will walk through the complete process of deploying a Node.js application on an AWS EC2 instance using PM2 for process management. Additionally, we will configure an NGINX reverse proxy for routing requests to the application and secure the deployment with a free SSL certificate from Let’s Encrypt. This guide ensures a production-ready setups , along with HTTPS support for secure communication.
Step 1: Create an AWS Account
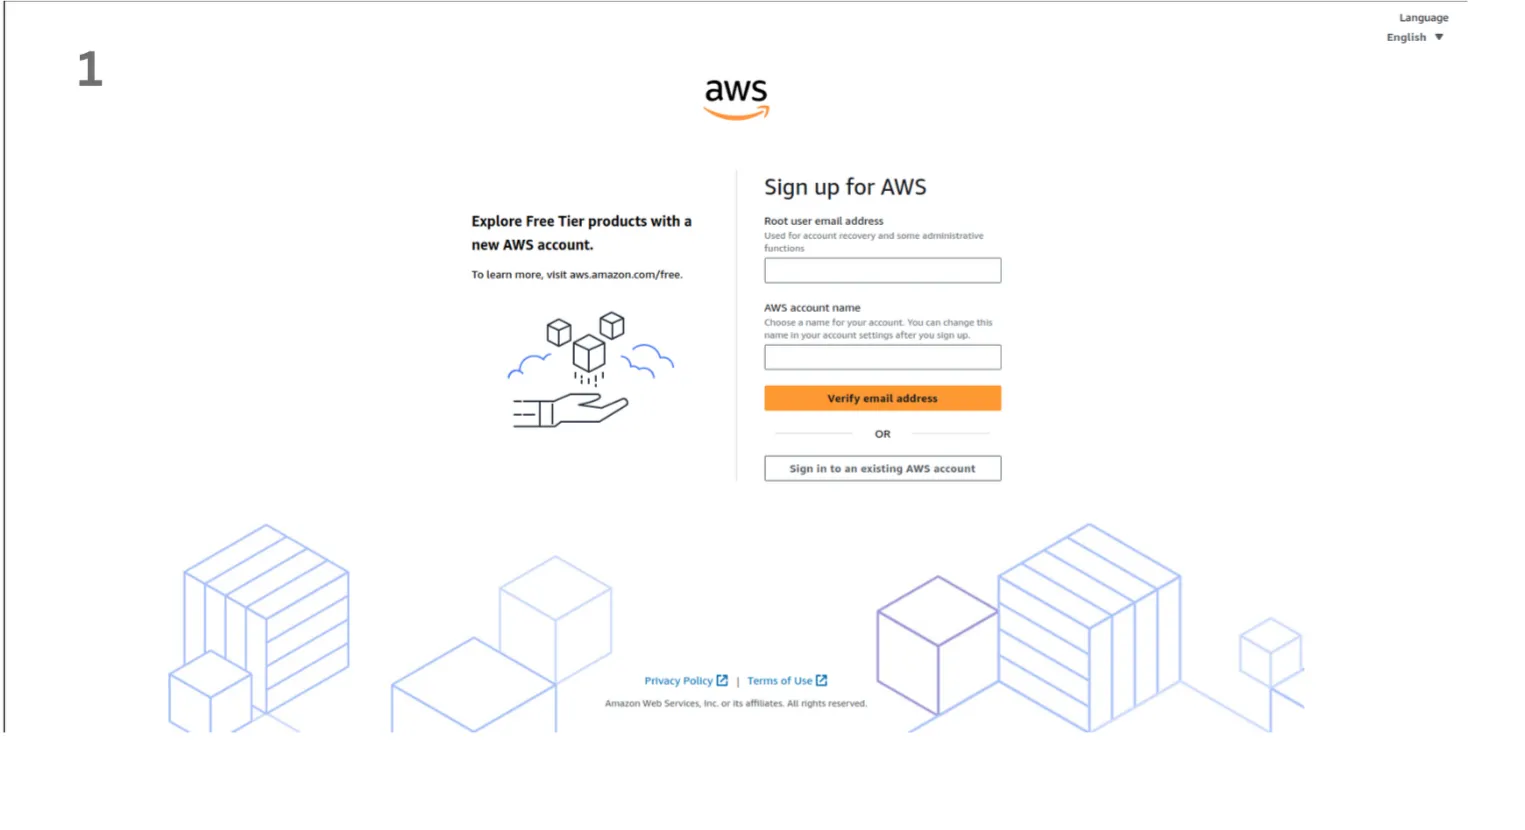
- First, you need to create an AWS account. Go to the AWS website and sign up for a free account. You will need to provide some basic information about yourself and your company.
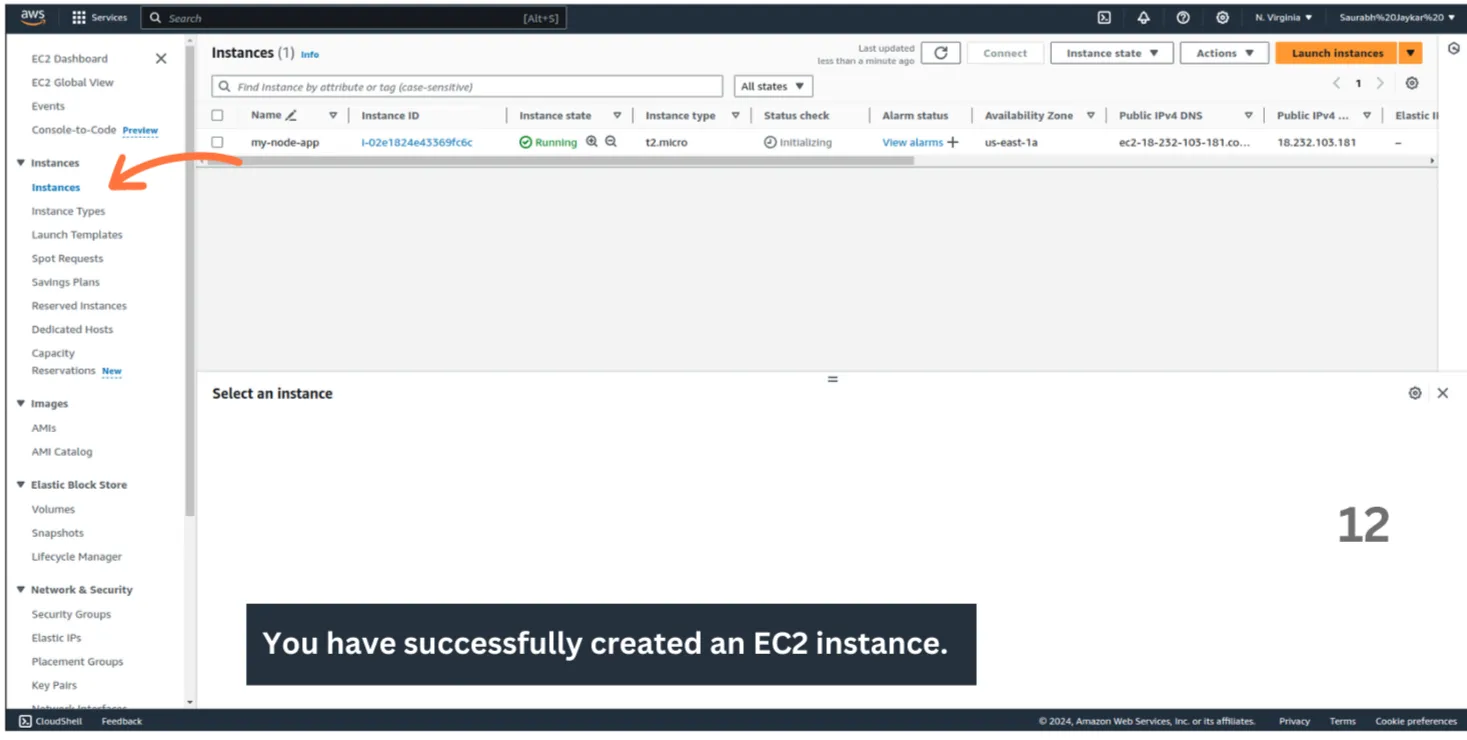
Step 2: Create an EC2 Instance
- An EC2 (Elastic Compute Cloud) instance is a virtual server in Amazon’s cloud where you can run your applications. Follow these steps to create an EC2 instance:
-
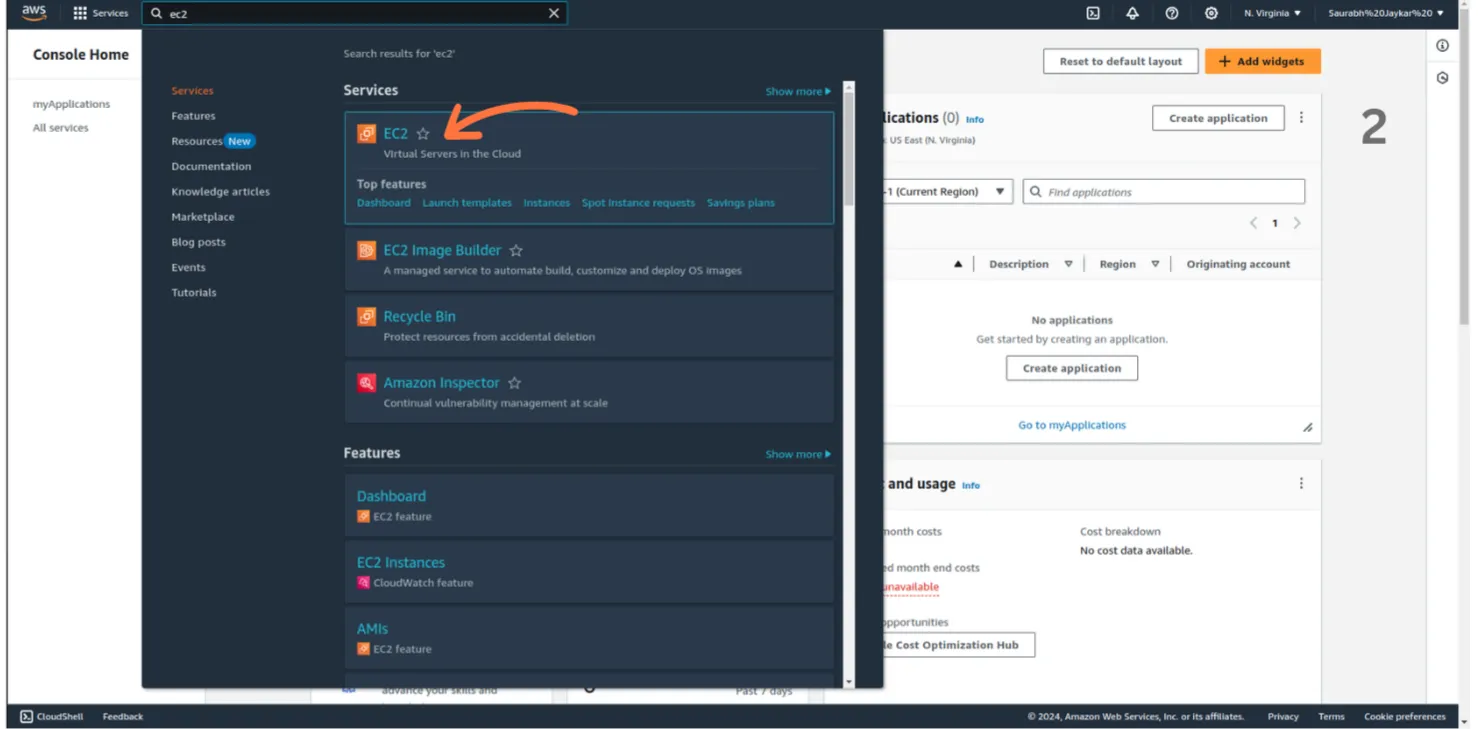
Navigate to the EC2 Dashboard:
- Once logged into your AWS account, go to the EC2 service by searching “EC2” in the AWS Management Console.
-
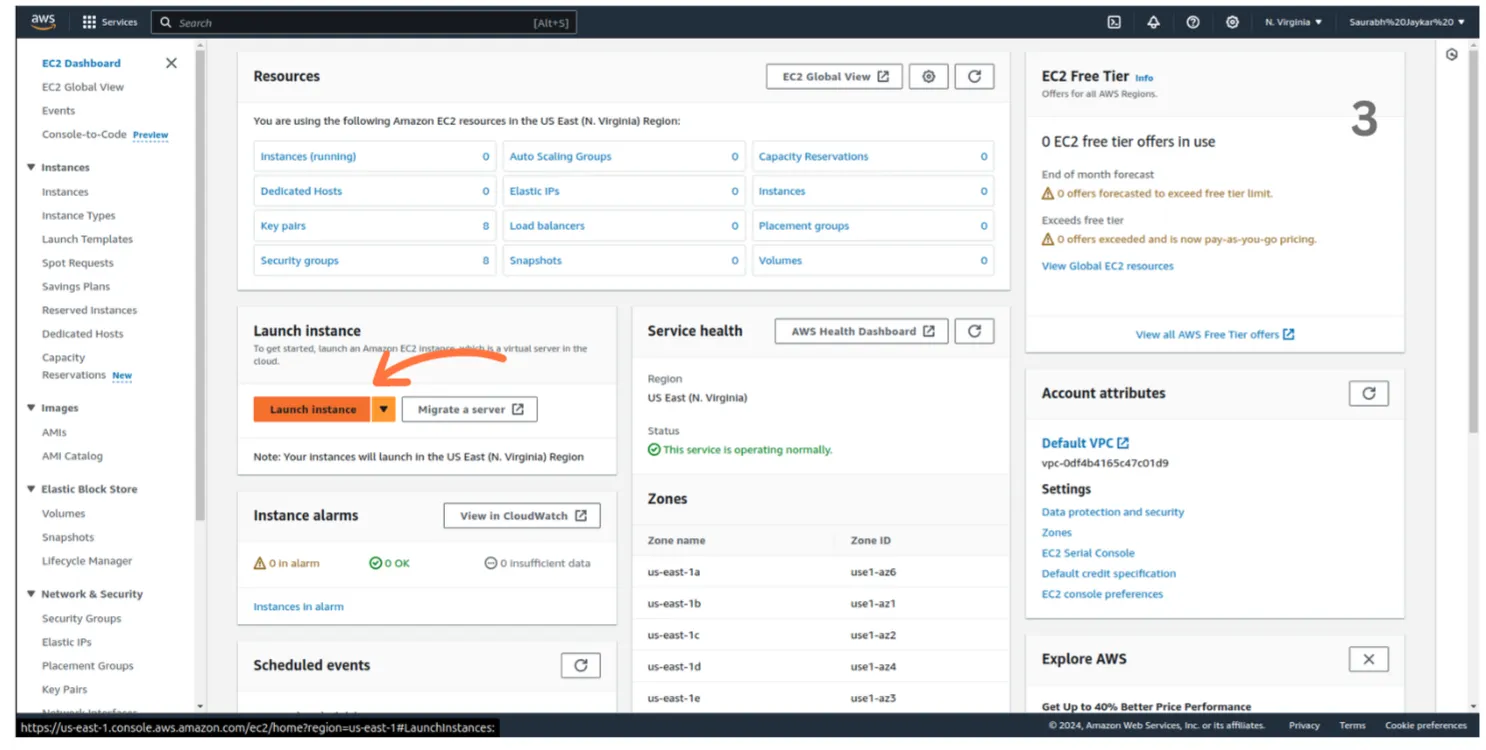
Launch a New EC2 Instance:
- Click the “Launch Instance” button.
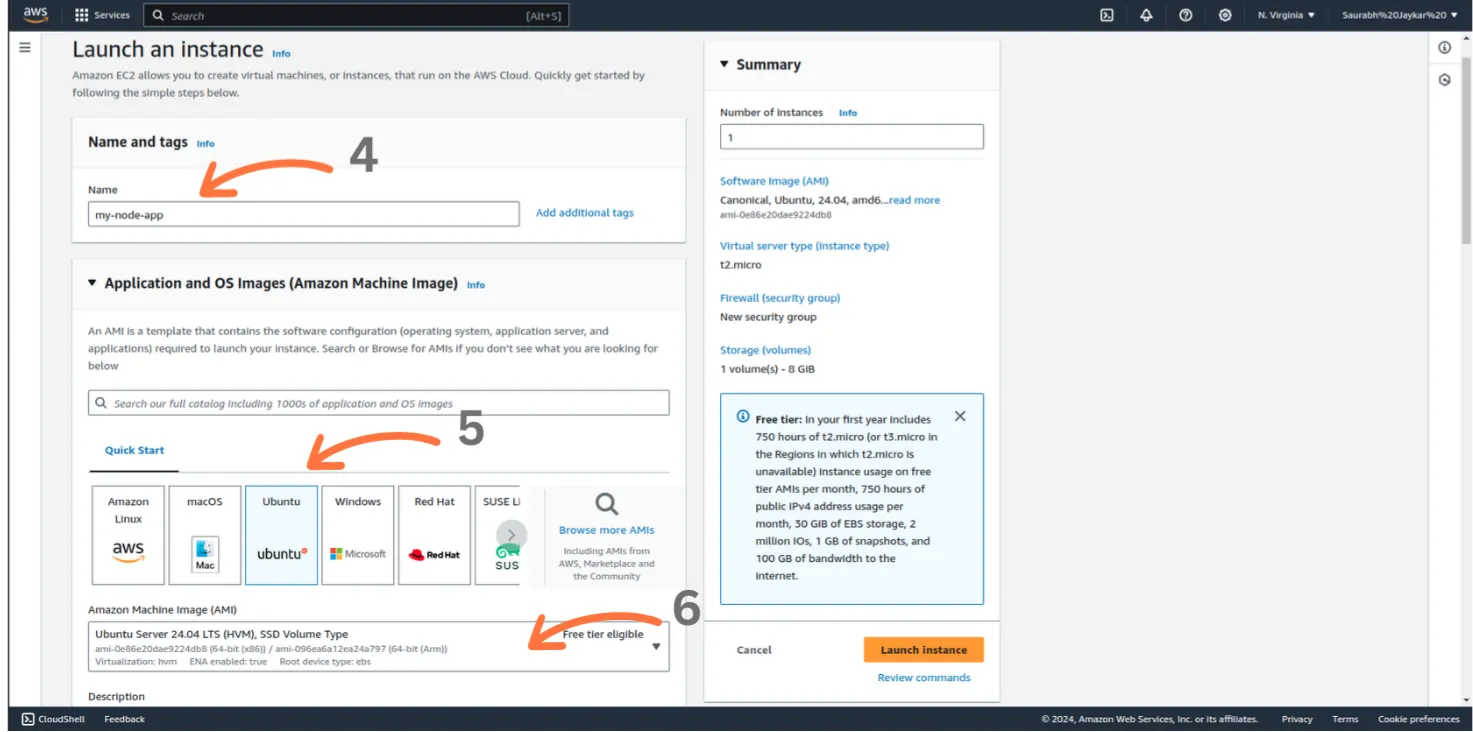
- Choose the Amazon Machine Image (AMI). For Node.js deployments, select a Linux-based AMI, such as Ubuntu Server 24.04 LTS.
- Click the “Launch Instance” button.
-
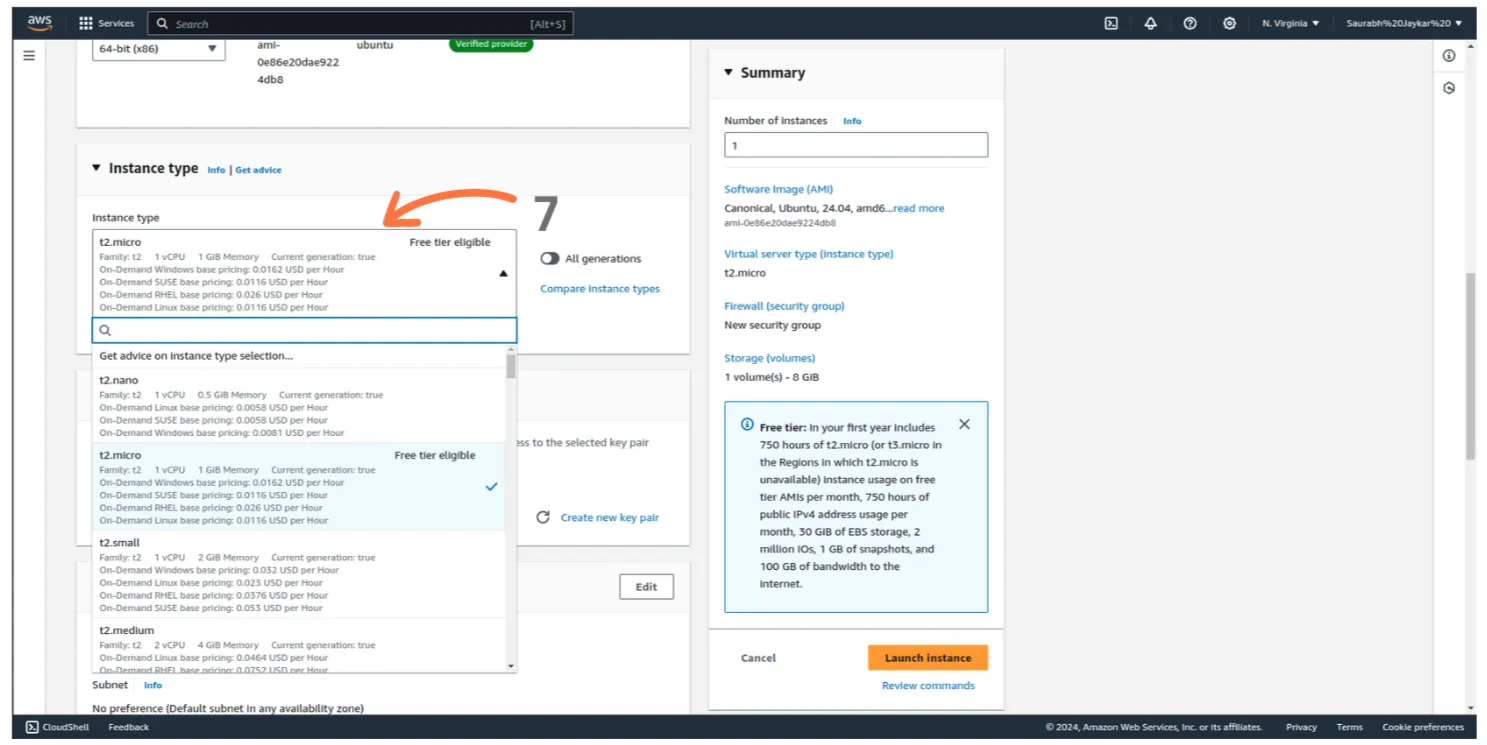
Select an Instance Type:
- For development or small-scale production, the t2.micro instance (eligible for the AWS Free Tier) is recommended.
- This instance provides 1 vCPU and 1GB of memory.
-
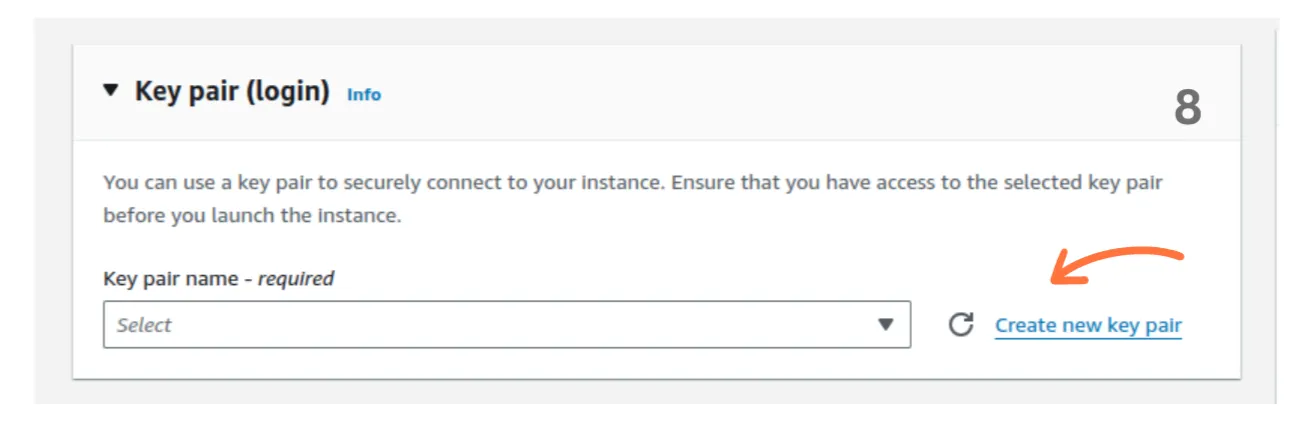
Create a Key Pair:
-
If you don’t already have a key pair, click Create new key pair.
-
Select RSA as the key type and .pem as the format. This key pair will be used to securely connect to your instance.
-
Download the
.pemfile and store it in a safe location. You’ll need this to access the instance using SSH.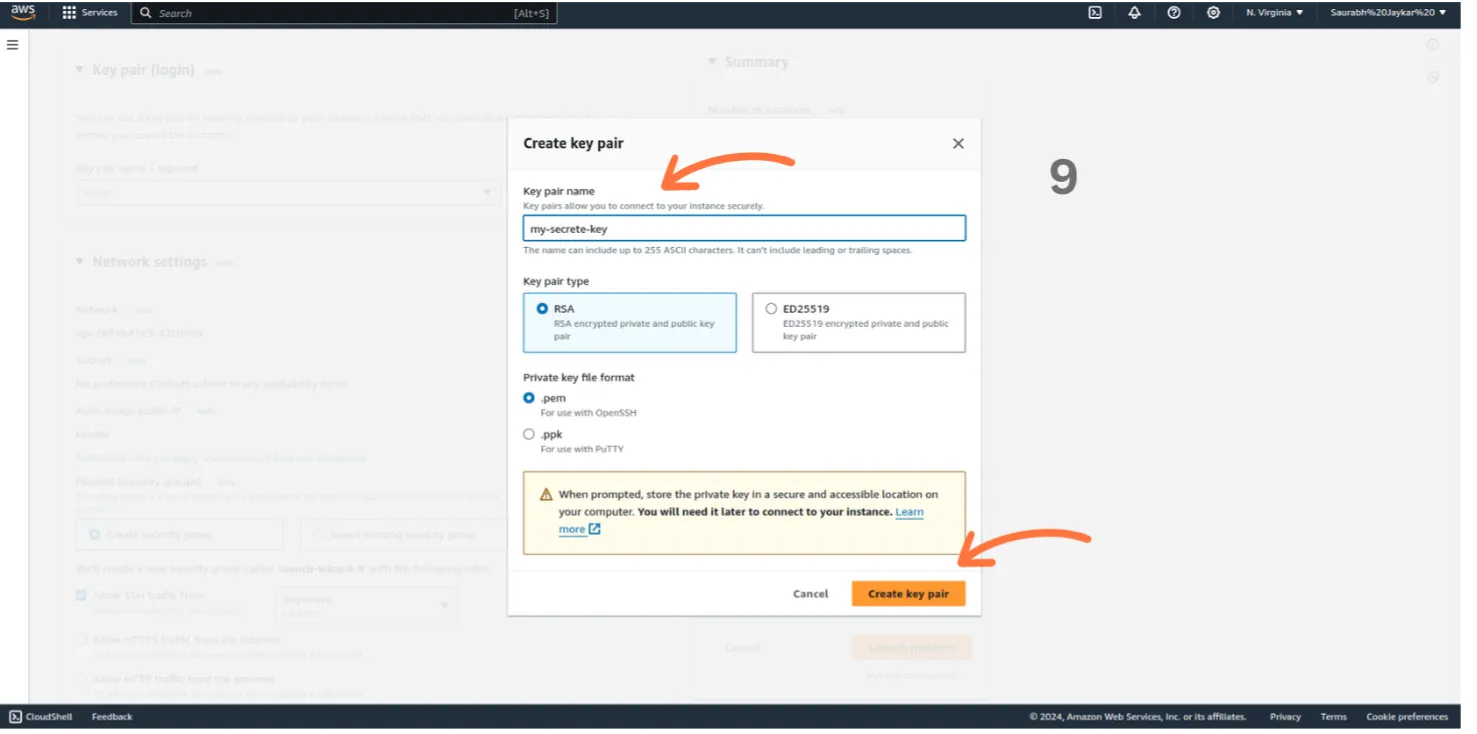
-
If you already have an existing key pair, you can select it from the dropdown.
-
-
Configure Instance Details:
- Choose the default settings unless you have specific network preferences. Ensure you place your instance in the right VPC and subnet.
- Choose the default settings unless you have specific network preferences. Ensure you place your instance in the right VPC and subnet.
-
Add Storage:
-
The default storage size is typically sufficient for most Node.js applications, but you can adjust it if your project requires additional space. For standard Node.js deployments, 8GB to 16GB of storage is generally recommended to ensure smooth operation and accommodate application files, logs, and other data.
-
Your Instance is Ready 🎉.
-
Step 3 : Assign an Elastic IP
- An Elastic IP (EIP) is a static IP address that you can use to connect to your instance from anywhere in the world. Follow these steps to assign an EIP
-
Assign an Elastic IP:
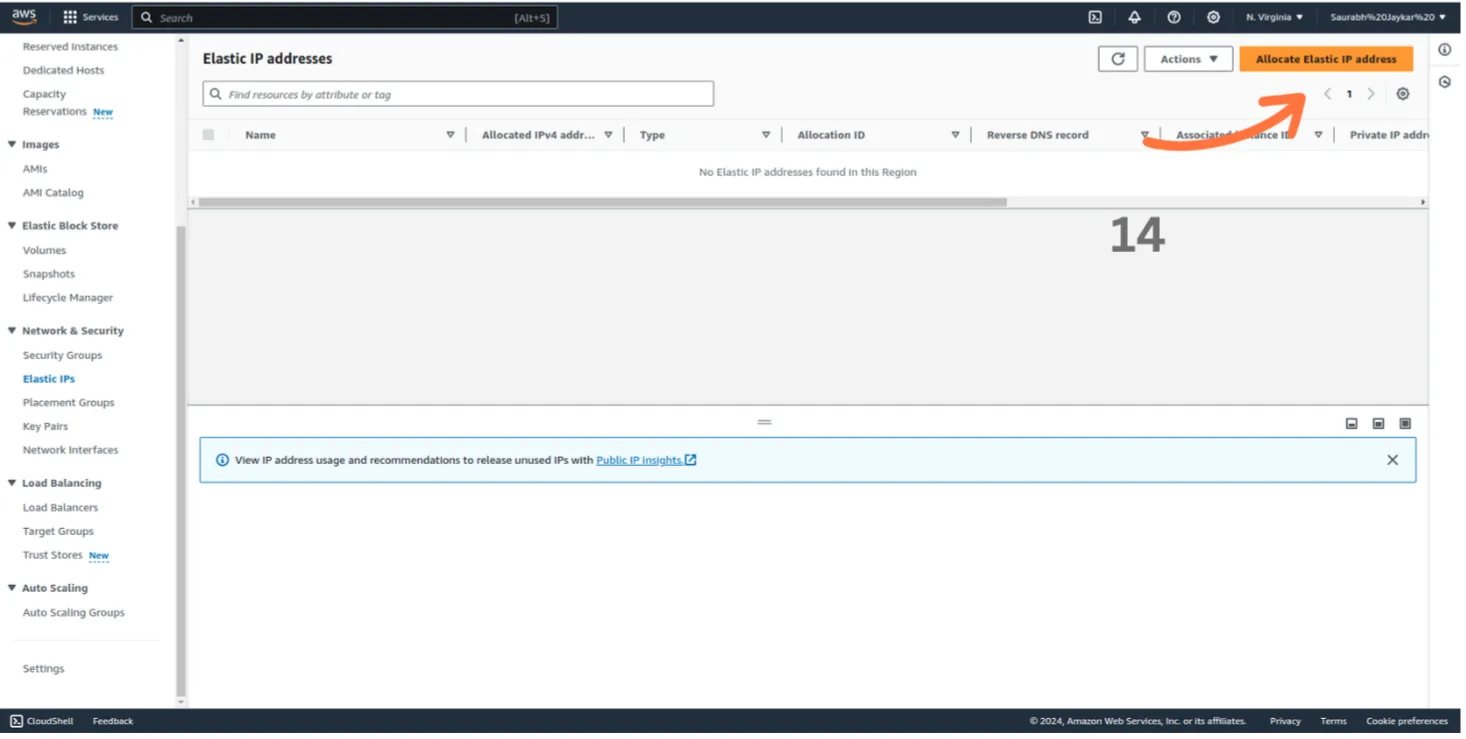
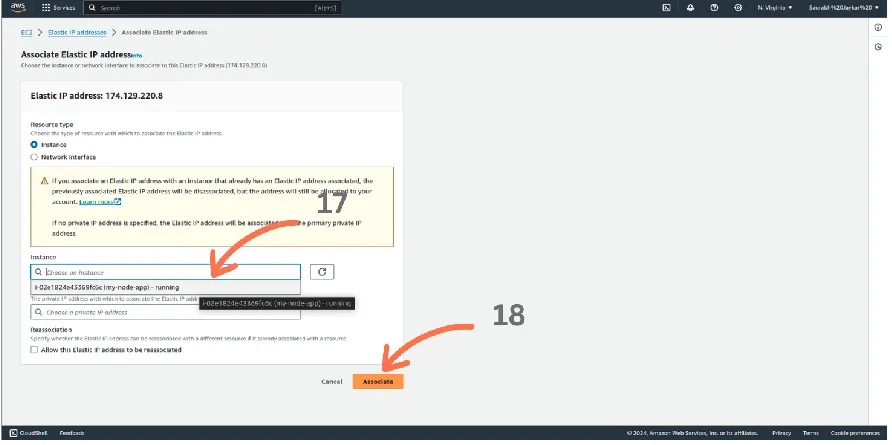
- After launching the instance, navigate to the Elastic IPs section in the EC2 Dashboard.
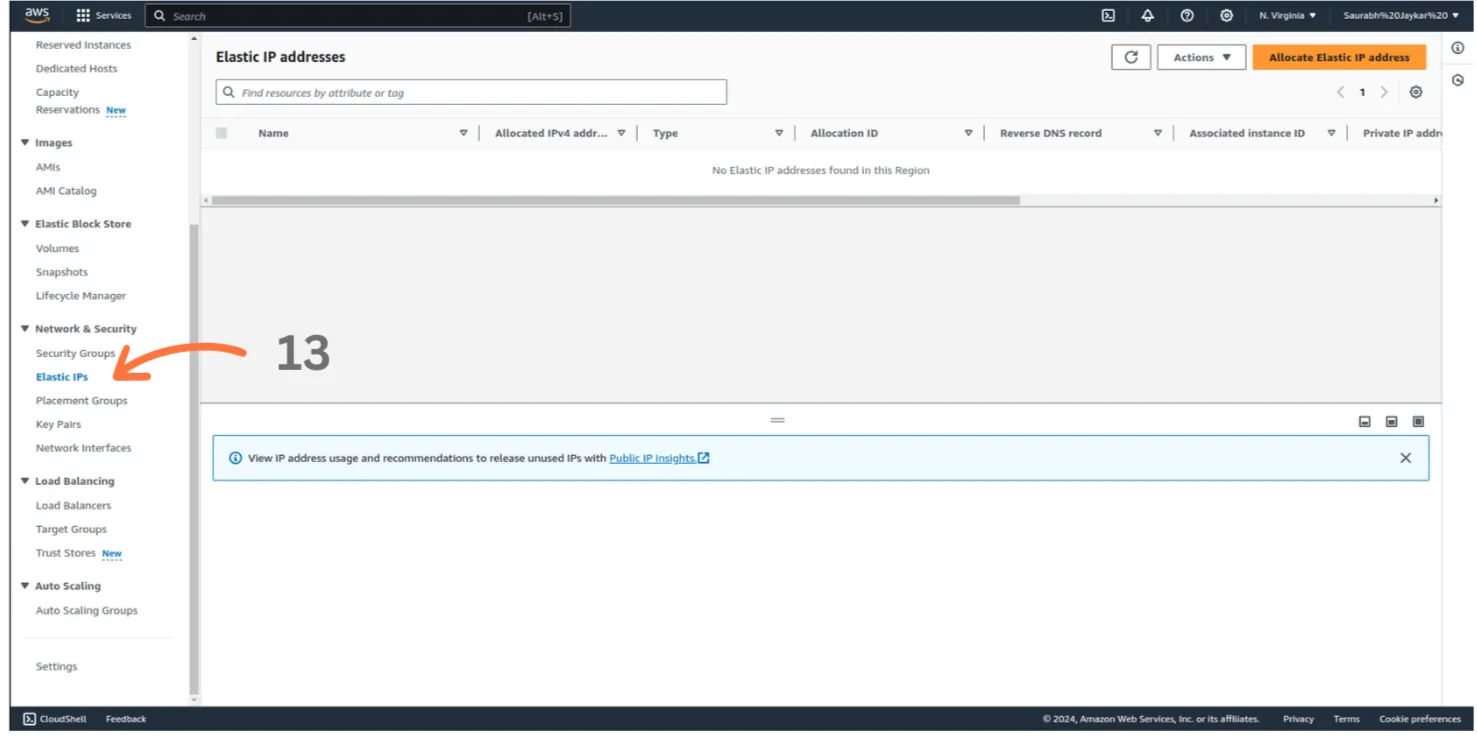
- Click Allocate Elastic IP address to reserve a static public IP.
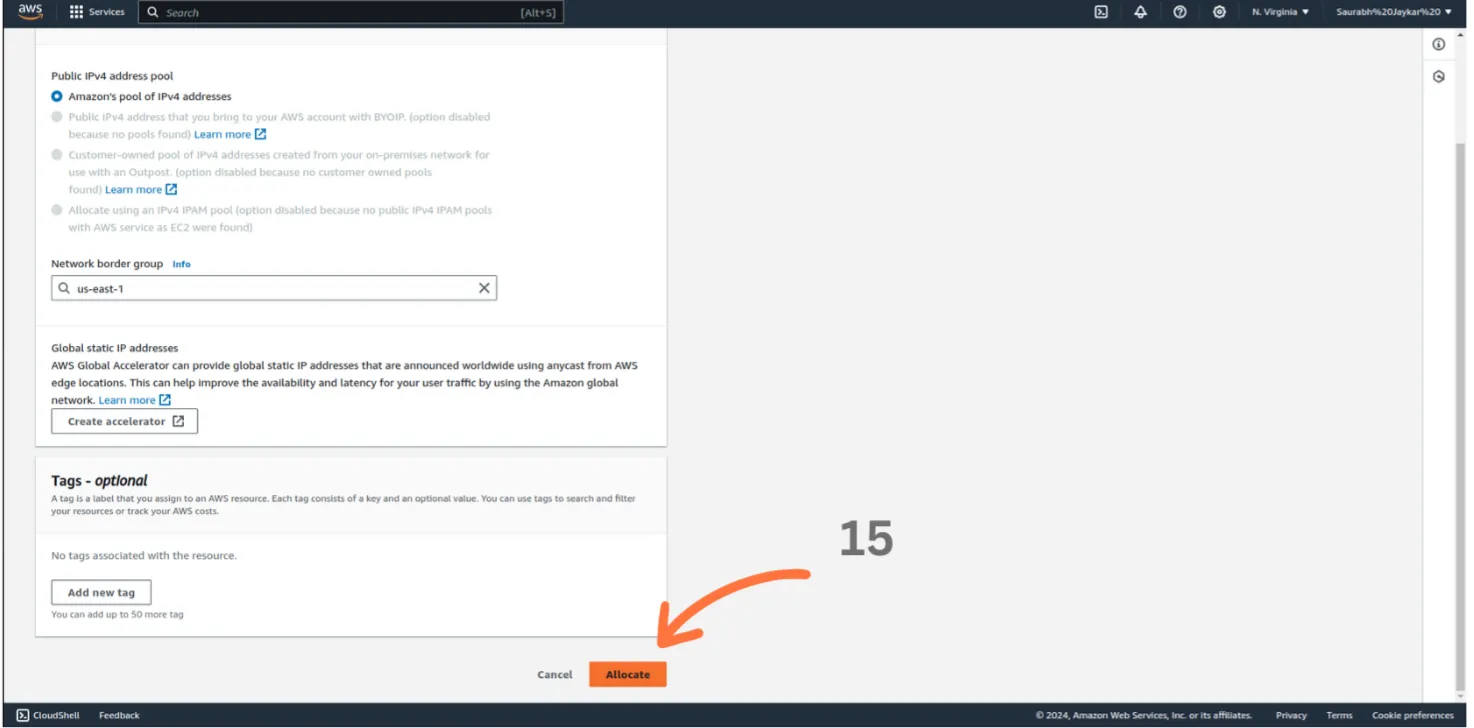
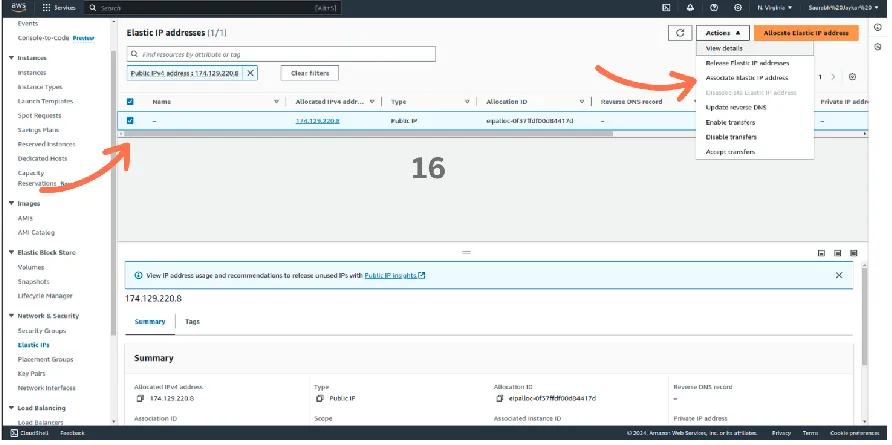
- Once allocated, select the Elastic IP, click Actions, and choose Associate Elastic IP.
- In the association options, select your EC2 instance. This ensures that your instance retains the same public IP address, even after a reboot, making it easier to connect and manage.
- After launching the instance, navigate to the Elastic IPs section in the EC2 Dashboard.
Step 4 : Configure Security Groups
-
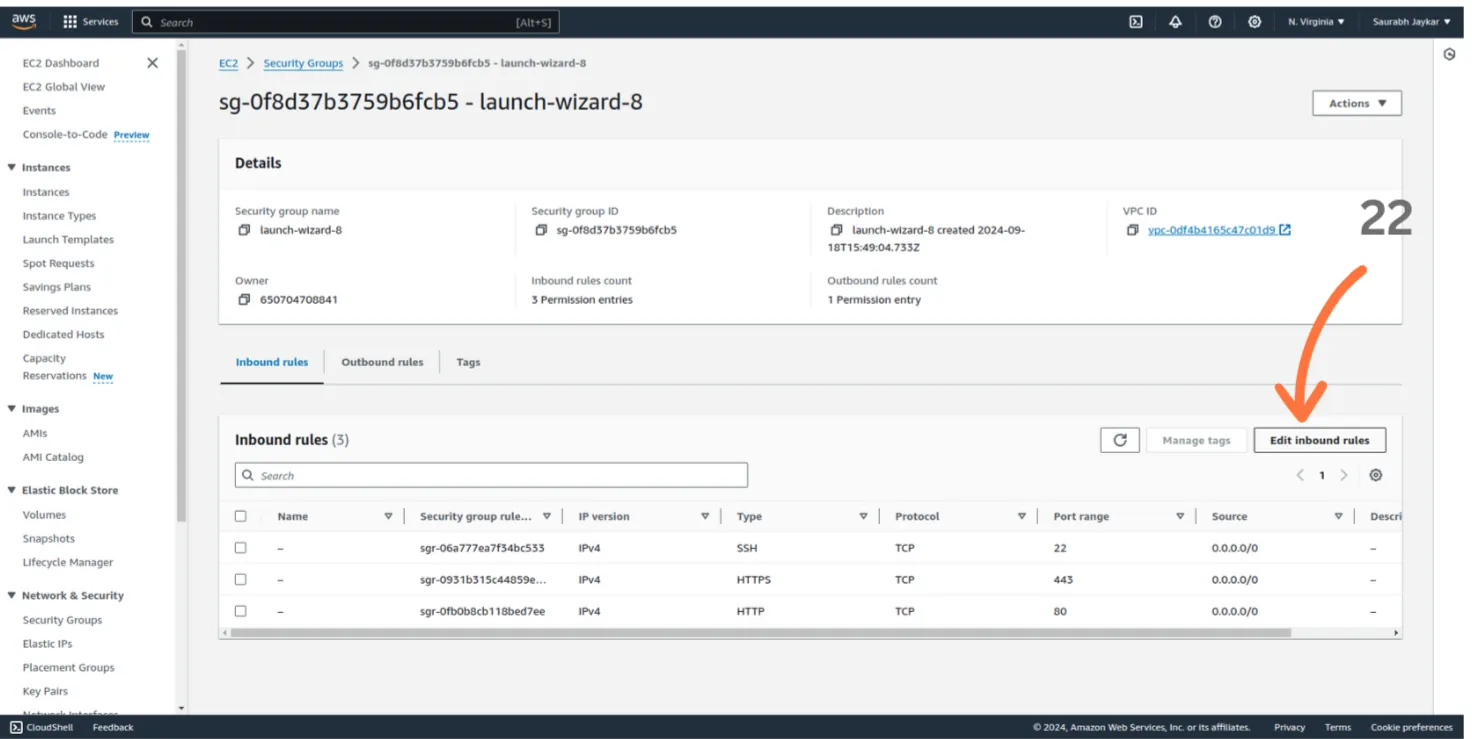
Navigate to Security groups:
- In the EC2 dashboard, navigate to the Instances section.
- Click on the Security tab.
- Click on the Security Groups tab.

- Click on the Edit Inbound Rules tab.
-
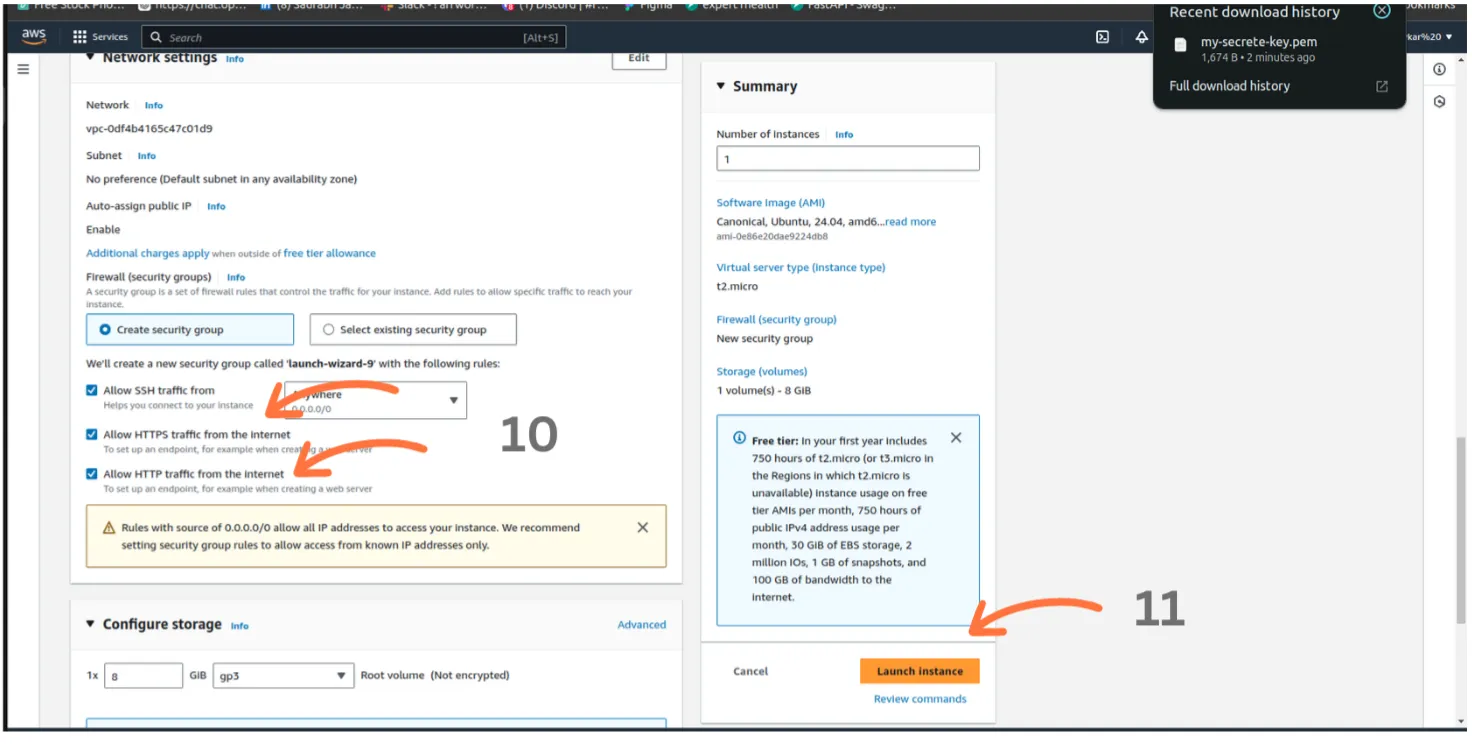
Configure Security Groups:
Security groups act as a virtual firewall. Add the following inbound rules:
-
SSH (Port 22): Allows you to connect to the instance using SSH.
-
HTTP (Port 80): Required for regular web traffic.
-
HTTPS (Port 443): For secure web traffic after SSL is configured.
-
Optionally, add Custom TCP rules for any other required ports.
- For example:
- Backend API: If your server is listening on ports like 8000 or 5000, add those ports to allow access.
- Frontend (React): If you’re running a React app on port 3000, add a rule for port 3000 to access the frontend.
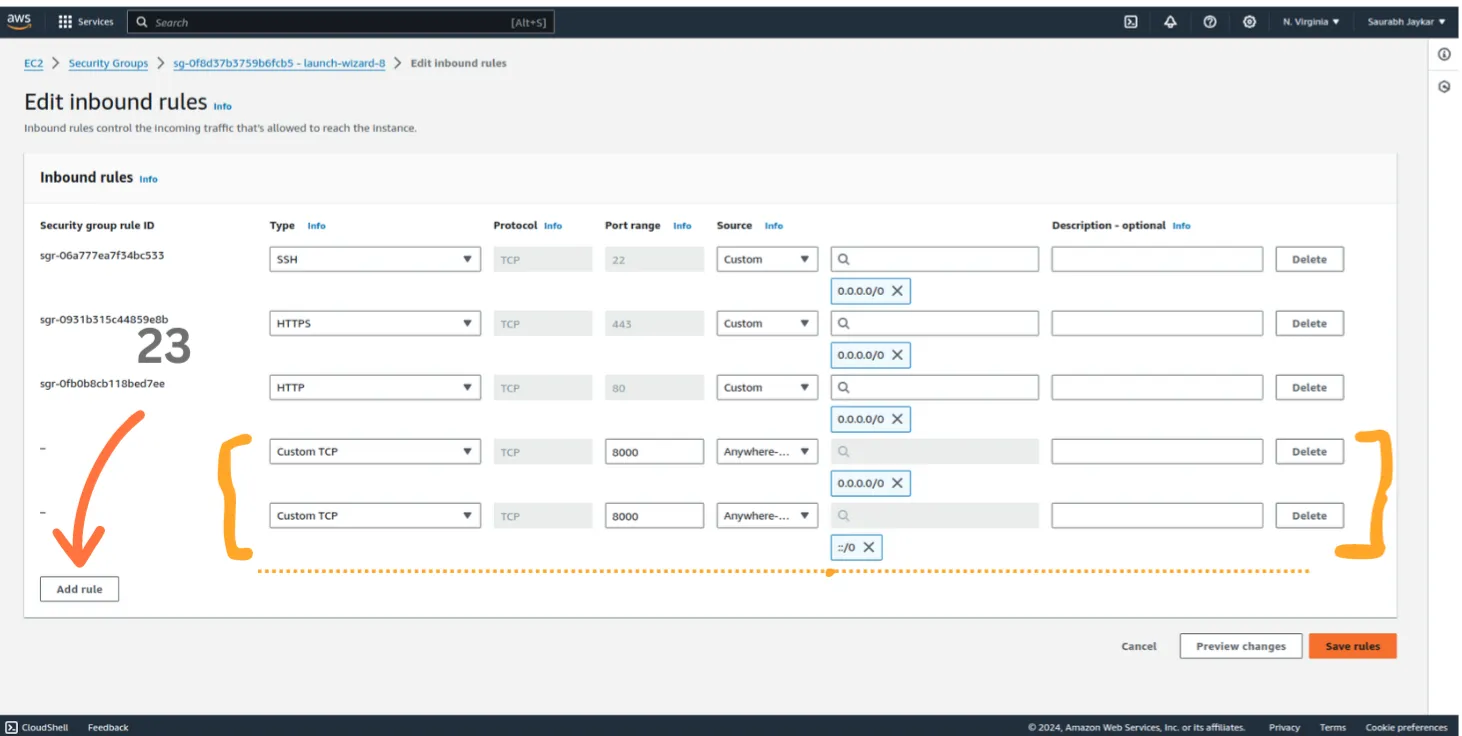
- save 🎉
-
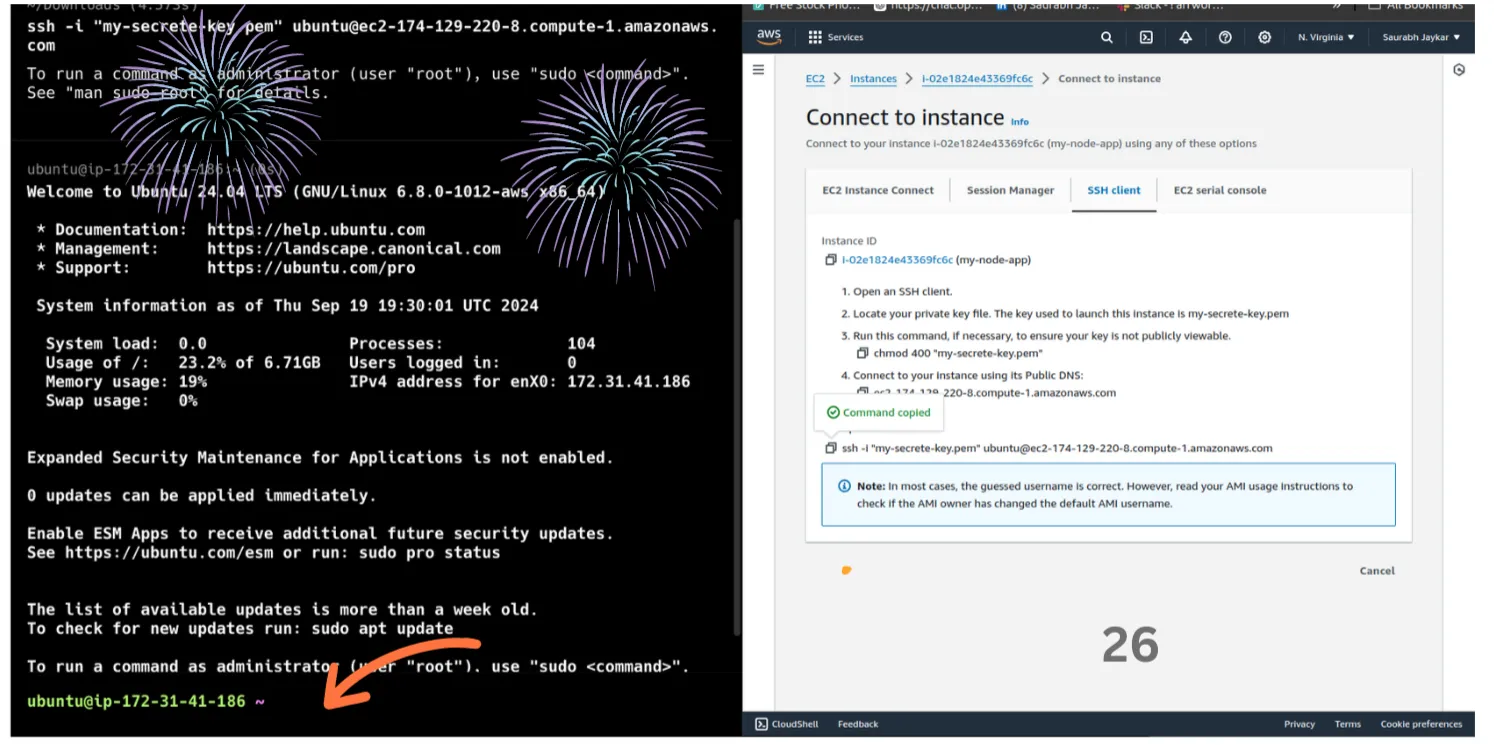
Step 5 : Connect to Your Instance
-
Connect to your instance using SSH:
-
After assigning an Elastic IP address to your instance, connect to it via SSH by following these steps:
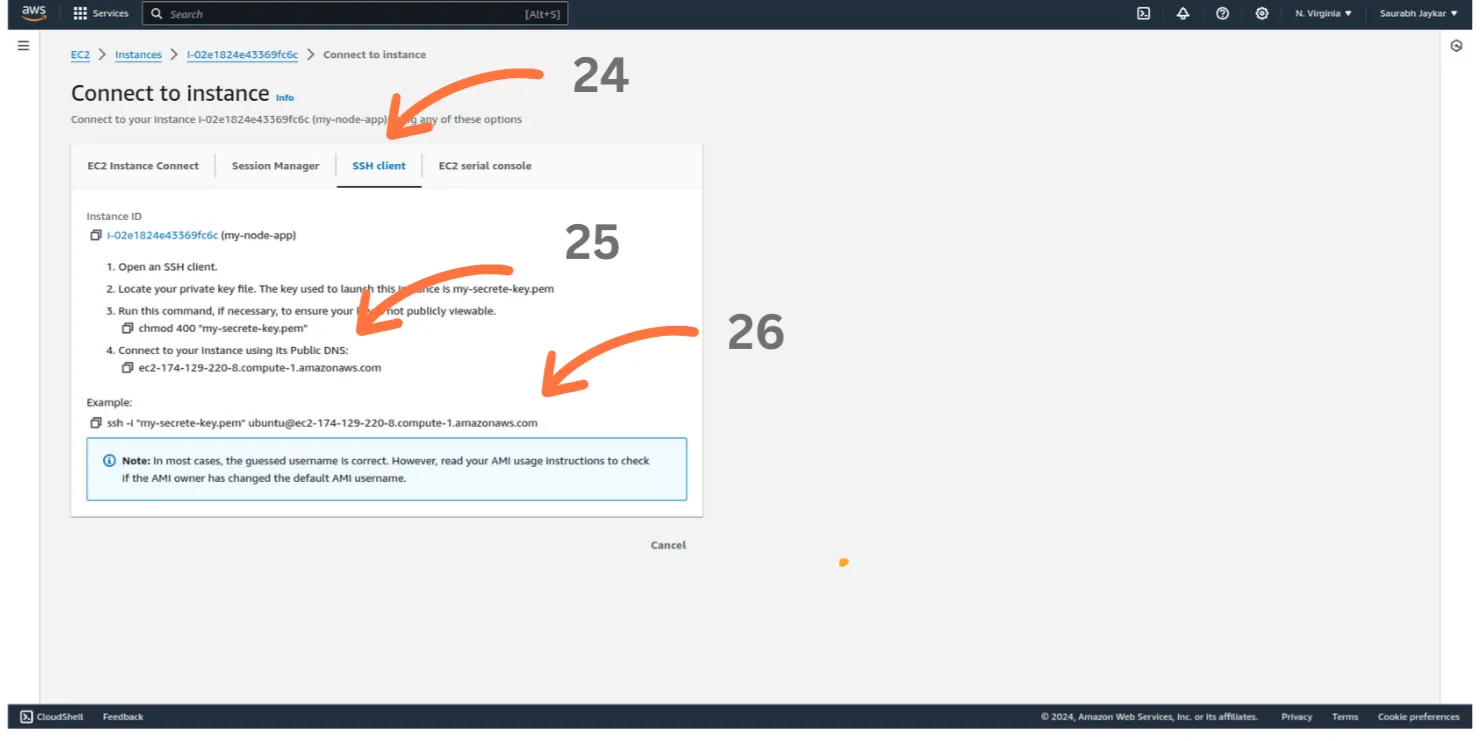
Terminal window ssh -i "path-to-your-key.pem" ubuntu@your-instance-public-ip -
Replace
"path-to-your-key.pem"with the path to your private key file. -
Replace
"your-instance-public-ip"with the public IP address of your instance. -
You should now be logged in to your instance.
-
Step 6 : Install Node.js on Virtual Machine
-
Install Node.js:
To install Node.js on your instance, run the following commands:
Terminal window curl -sL https://deb.nodesource.com/setup_18.x | sudo -E bash -sudo apt install -y nodejsnode --version- This will install Node.js version 18.x.
- Verify the installation by checking the Node.js version with the
node --versioncommand.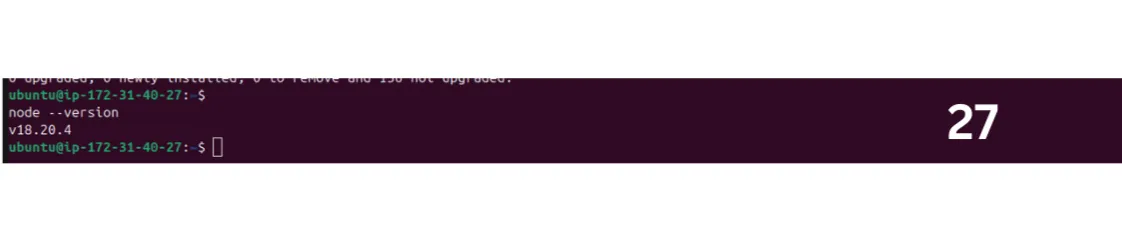
Step 7 : Clone Your Project ans install Dependencies
-
Clone your project:
To clone your project from a Git repository, use the following command:
Terminal window git clone https://github.com/your-username/your-repository.git- Replace
your-usernamewith your GitHub username (or relevant Git hosting service). - Replace
your-repositorywith the name of your repository.
Once the project is cloned, navigate into the project directory:
Terminal window cd your-repository- Replace
your-repositorywith the name of your cloned repository.
- Replace
-
Install project dependencies:
After cloning the repository, run the following command to install the necessary dependencies:
Terminal window npm installThis will install all the required Node.js modules listed in your
package.jsonfile.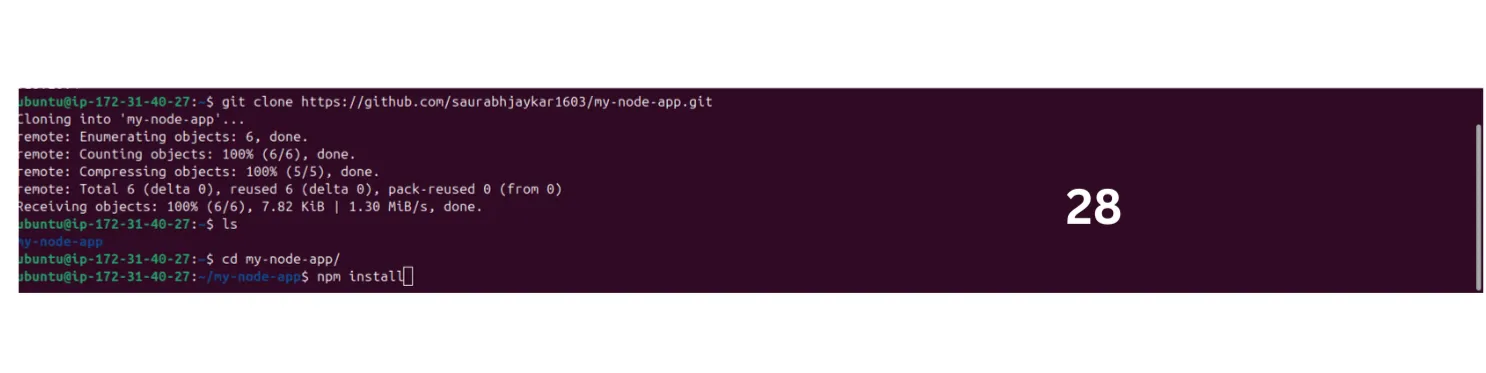
Step 8 : Install PM2 Globally and Test Your App
-
PM2 is a process manager for Node.js applications that helps you keep your apps running continuously, even after a server restart. It allows you to manage, monitor, and scale applications easily with commands for starting, stopping, restarting, and viewing logs. PM2 also provides features like automatic startup on boot, log management, and process clustering for better performance.
-
Install PM2 globally:
Use the following command to install PM2 globally on your server:
Terminal window sudo npm install pm2@latest -gPM2 is a process manager that helps you manage and keep your Node.js application running in the background.
-
Start your Node.js application using PM2:
- Navigate to the directory where your Node.js app is located:
Terminal window cd /path/to/your/app- Start your application with PM2:
Terminal window pm2 start server.js -- name my-node-app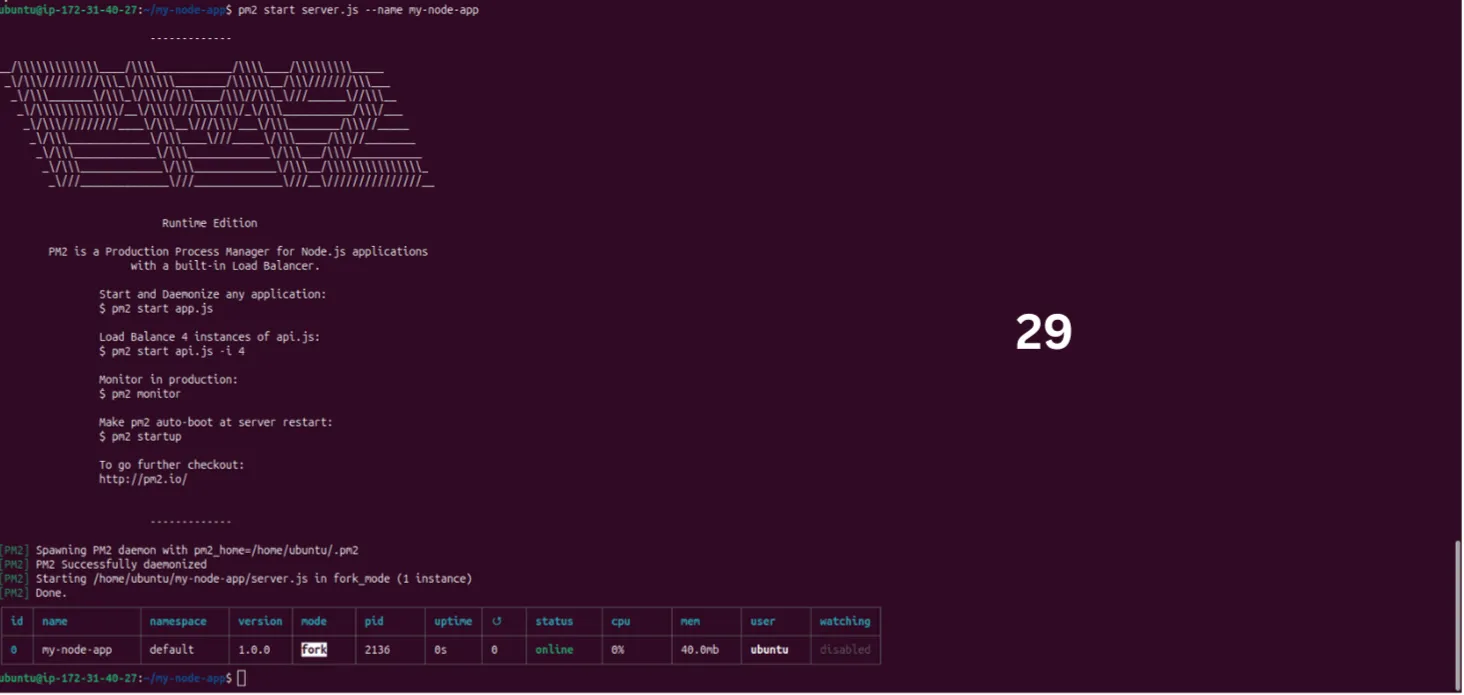
Replace
server.jswith the entry point file of your Node.js application.
-
Check the status of your application:
To view the status of your app, run:
Terminal window pm2 listThis will display all running applications managed by PM2.
-
Set PM2 to start on boot:
To ensure that PM2 and your app start automatically when the server restarts, run the following command:
Terminal window pm2 startupThen, follow the instructions printed on your terminal to enable PM2 at startup.
-
Save the current PM2 process list:
After starting your application, save the PM2 process list to restore it on reboot:
Terminal window pm2 save
-
View application logs:
To monitor the logs of your Node.js app, use the following command:
Terminal window pm2 logs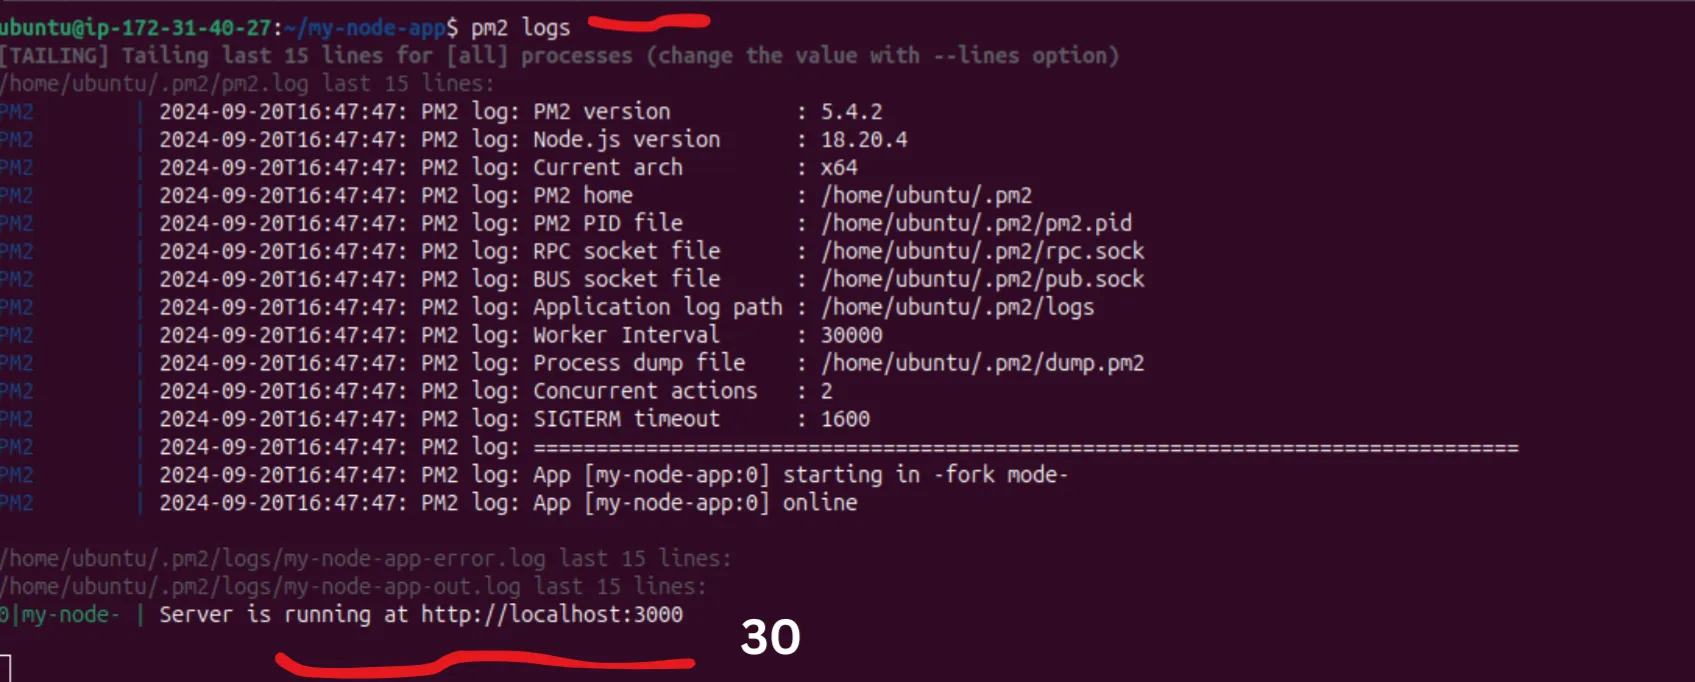
This will allow you to track logs for debugging or monitoring purposes.
-
Other PM2 Commands
-
Show details of an app:
To view detailed information about a specific application, use:
Terminal window pm2 show appReplace
appwith the name or ID of your application.
-
Check the status of all applications:
To see the status of all running applications:
Terminal window pm2 status
-
Restart an application:
To restart a specific app:
Terminal window pm2 restart appReplace
appwith the name or ID of your application.
-
Stop an application:
To stop a running application:
Terminal window pm2 stop appReplace
appwith the name or ID of your application.
-
Clear logs:
To clear all logs maintained by PM2:
Terminal window pm2 flush
Note: The above commands are for the basic usage of PM2. For more advanced features and options, you can refer to the official PM2 documentation.
-
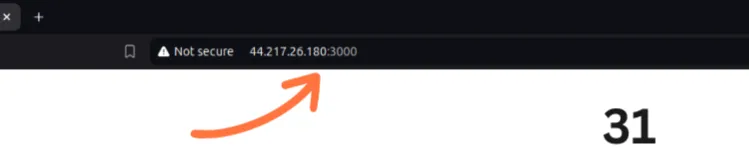
Project Running on IP and Port
-
Your project is now running on the specified IP and port:
Step 9 : Install NGINX and Configure
- Why Use NGINX?
- Reverse Proxy: NGINX acts as a reverse proxy, allowing you to manage traffic to your Node.js app efficiently. It forwards requests and handles load balancing, improving performance and reliability.
- Static File Serving: NGINX is excellent at serving static files (like images, CSS, and JavaScript) quickly and efficiently, freeing up your Node.js application to handle dynamic content.
- SSL Termination: NGINX can handle SSL/TLS encryption, allowing secure HTTPS connections while offloading this work from your Node.js application.
- Connection Handling: NGINX can handle a large number of concurrent connections, which is beneficial for high-traffic applications, ensuring better resource management.
- Caching: NGINX can cache responses to reduce load on your backend and speed up response times for users.
-
Install NGINX:
To install NGINX on your server, run the following command:
Terminal window sudo apt install nginx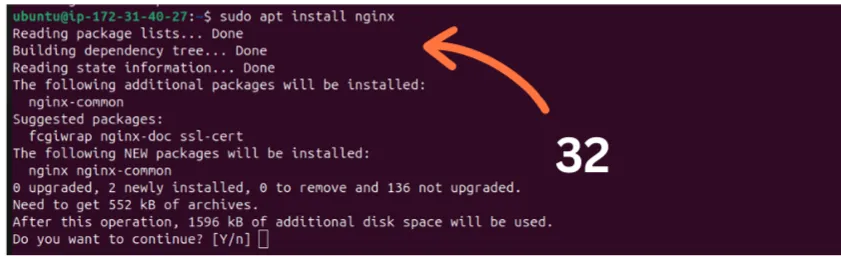
-
Configure NGINX:
- Open the NGINX default site configuration file using
vim(or any text editor):
Terminal window sudo vim /etc/nginx/sites-available/default- Modify the configuration to serve your Node.js application. Update the
serverblock as needed (an example config is provided below):
server_name yourdomain.com www.yourdomain.com;location / {proxy_pass http://localhost:8001; #whatever port your app runs onproxy_http_version 1.1;proxy_set_header Upgrade $http_upgrade;proxy_set_header Connection 'upgrade';proxy_set_header Host $host;proxy_cache_bypass $http_upgrade;}- Replace
your-domain.comwith your actual domain orIP address.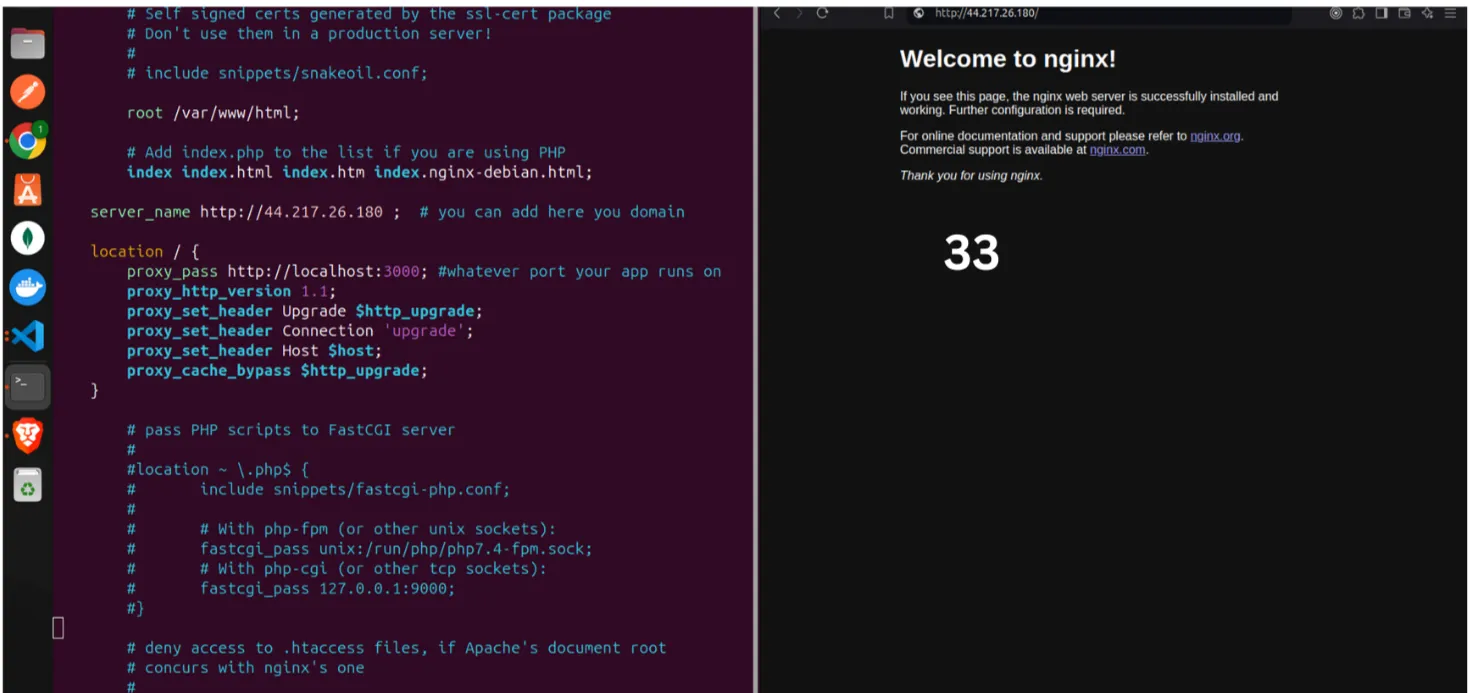
- Open the NGINX default site configuration file using
-
Enable the configuration and restart NGINX:
- Check for any syntax errors in your NGINX configuration:
Terminal window sudo nginx -t- If there are no errors, restart NGINX to apply the changes:
Terminal window sudo nginx -s reload
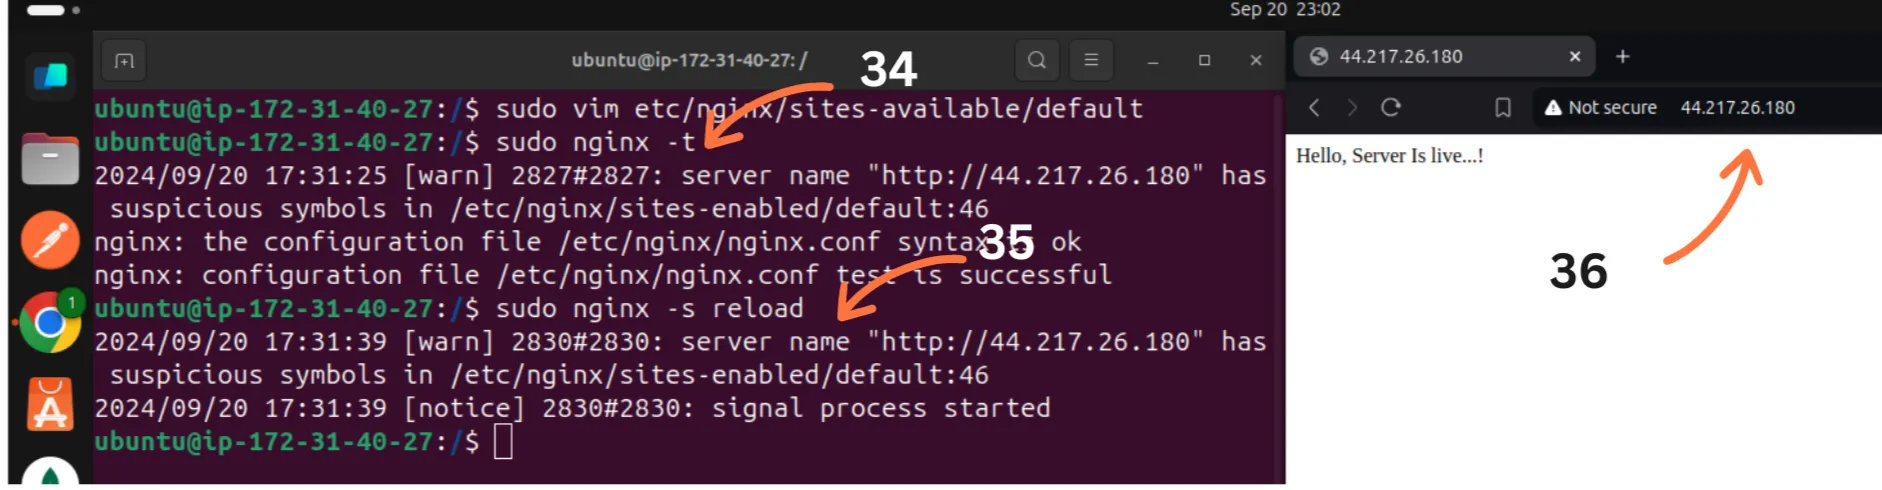
Now, NGINX should be serving your Node.js application. You can access it via your domain or IP.
Step 10 : Add SSL with Let’s Encrypt
-
To add SSL with Let’s Encrypt, you need to install the Certbot package on your Ubuntu server. Follow these steps:
- Add the Certbot PPA:
Terminal window sudo add-apt-repository ppa:certbot/certbot- Update the package list:
Terminal window sudo apt-get update- Install Certbot and the NGINX plugin:
Terminal window sudo apt-get install python3-certbot-nginx- Obtain an SSL certificate:
Use the following command to configure SSL for your domain:
Terminal window sudo certbot --nginx -d yourdomain.com -d www.yourdomain.com-
Replace
yourdomain.comwith your actual domain name.
- Test the renewal process:
Certificates from Let’s Encrypt are valid for 90 days. To ensure your renewal process works, you can run:
Terminal window certbot renew --dry-runThis command simulates the renewal process to verify that it will work when your certificate is close to expiration.